John originally contacted me from the Bahamas to bring in a Land Cruiser that he hadn't bought yet but knew he wanted a simple audio upgrade before shipping it back to the Bahamas. So he found one, bought it and brought it in for a simple upgrade but that all went awry after he meet one man, Nelson. After a demo of Nelson's car (Project Individual) John knew that a DynAudio Esotar set up was the way to go, so out the window went the simple system set up and hello to the blame it on Nelson build.
Guide lines for the build was to keep everything as OEM as possible and not to take up any rear cargo room. I originally said no problem because the size of the truck but once the build got started that was a statement that would come to bite me in the butt.
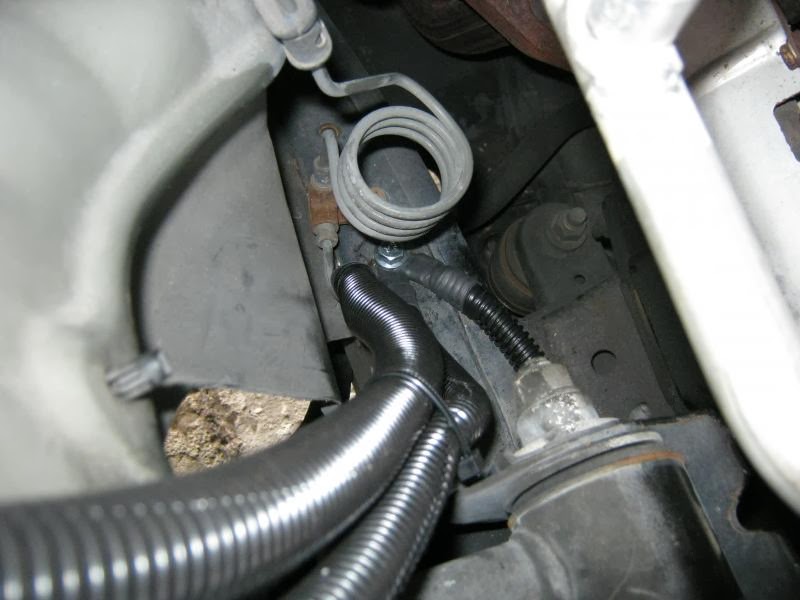
The electrical system was upgraded to accommodate the new audio system. The battery to chassis ground, battery to alternator, alternator to chassis ground were upgraded with 4ga wiring.
The OEM battery terminal had one open spot open and that was utilized for positive hook up.
The main fuse for the audio system is mounted on a fabricated metal mount that mounts using OEM mounting points.
On the frame in the engine compartment there was an open threaded hole which was used for an upgraded grounding point.
The alternator had an unused stud that served as a point for an upgraded ground run to chassis.
Radio wiring harness was soldered then wire tied for a clean install.
The brain for the satellite radio interface fit perfect inside the center console.
The Pioneer AVH-P8400BH mounted in the dash. A clean wiring harness makes for any future work in dash an easy venture.
The entire floor of the truck received a layer of Focal BAM sound damping. All speaker wire and RCAs are held down with Hush Mat Quite Tape spaced at 8" increments. Straight Wire was tasked for the speaker wire and their Symphony RCAs.
Black Hole Tiles were used inside the door to kill the rear speaker sound waves.
Removable 1/8" ABS panels were fabricated to seal up the holes in the inner door skin. They were also heat formed to follow the contours of the door for a better seal.
An Octave staple is to use plexiglass in the fabrication of door mounting rings. The plexiglass is used to assure against the possibility of moisture destroying the mounting rings, which happens with wood mounting rings.
Nutserts were used to provide a secure mounting point for the mounting rings. The inside door skin also received a layer of Focal BAM sound damping.
The speaker terminals were heat shrunk to guard against moisture and then zip tied to the frame to assure against the leads backing out.
Once wired up the DynAudio Esotar E650 was mounted to the rings using #8 screws.
The passenger received the same treatment as the driver's door.
The speaker leads for the kick panel speakers were also heat shrunk.
Once wired up the DynAudio Esotar E110 and E430 were mounted to the kick panel using #6 screws. The kick panel was wrapped in OEM vinyl. To finish off the interior of the kick panel black Alcantara was used.
A removable grille was fabricated to protect the speaker while the truck was in daily use but can be easily removed for critical listening.
The same grille cloth used on the kick panel was also used to redo the grille on the door panel. It also allows the kick panels to have a more like they're a part of the interior.
Once the driver's side kick panel was done the passenger received the same treatment.
The kick panel grilles have a layer of metal mesh over the front of them to safe guard against the possibility of anything coming in contact with the speakers.
As to not take up rear cargo room fiberglass enclosures were fabricated to tuck into the back corners as far as possible.
1/4-20 nutserts were used to mount the enclosures.
Black Hole Stuff enclosure filled 100% of the interior of the enclosure less room for the driver. Black Hole Stuff enclosure filled 100% of the interior of the enclosure less room for the driver. With the enclosures coming in at .43cuft the Stuff fill will provide the extra compliance to allow the subwoofers to have a lower end extension that will not have been possible with such a small enclosure. The stuff is magic (pardon the pun).
The Illusion Carbon 10 was used for it's SQ output while being a slim mounting woofer.
The passenger side enclosure was mounted the same as the driver with 1/4-20 nutserts and bolts.
A Mosconi 6to8 provides the signal processing for the audio system. Since space was at such a premium it was mounted to the backside of the amplifier mounting board. From this side you can also see the t-nuts that were used to mount the amplifiers
1/4-20 nutserts were used to mount the amplifier mounting board to the truck.
A Zapco Z-150.6 6-channel amplifier was used to power the front stage. More Hush Mat Quite Tape was used to hold down the wiring.
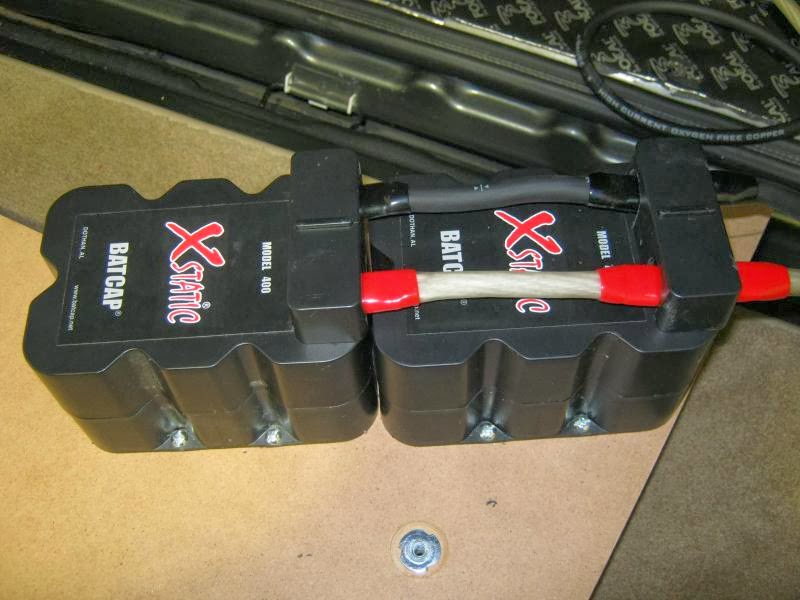
2 BatCap x400s were mounted the backside of the passenger amplifier panel. They're mounted using t-nuts.
1/4-20 nutserts were used for mounting the passenger amplifier panel to the metal structure of the truck.
A Zapco Z-150.4 4-channel was used to power the subwoofers. The passenger side amplifier panel is also home to the fused power and ground distribution blocks. Each amplifier is fused as well as the BatCaps.
Rear cargo wiring was held down with Hush Mat Quite Tape at 8" intervals and wiring intersections are at 90*.
The USB interface for the Mosconi 6to8 is hidden under the rear carpet for easy access for tuning sessions.
The rear panels were designed to take advantage of the OEM plastic panels as a base. The finished side panels were wrapped in OEM vinyl. Following the look of the kick panels black Alcantara was used to give a great contrast to the rear components. As you can see with the subwoofer grilles in place the rear cargo area looks very OEM and the best part being the audio system took up 0 rear cargo room. With this set up if John ever wishes to put the third row seating back in the audio system will not interfere with them going back in.
And to protect the subwoofers removable grilles were made and wrapped in the same grille cloth as the doors and kick panels.
This was by far one of the more challenging builds because the lack of space in such a large vehicle but in the end all the boxes were checked. Steve Head was on hand to lend a hand on tuning (look to see most cars getting a final tuning from the great one from now on). On initial set up (gain adjustment, crossover) we were shocked to hear that the sound stage was high, centered while being pillar wide and tonality was almost spot on. It was freaky how on point the system was out of the box but we did some tweaks to dial it in further. After small tweaks everything was dialed in further. The sound stage is high with defined center image while playing straight across to the pillars without any rainbowing. The bass from the Carbon 10s fills the cabin with rich unlocalizable up front bass. For being in such a small enclosure the subwoofers are definitely eye openers. Now many have asked about the quality of the new Zapco Z-series amplifiers. I would have to say after almost having a perfect sound out of the box without any sound processing goes to say something to the quality of the amplifiers. This being the second vehicle that I have done with them I certainly look forward to the next vehicle with these. Leaving the best for last the Esotars. What is there to say that hasn't been said in response to these bad boys? Natural..yup, warm....yup, clarity off the scales....yup, just fill in the blank and you have the Esotars. So in ending what we have is a concert on wheels ready to hit the beaches of the Bahamas and as usual Nelson is to blame. He really is a pain sometimes........
For more pictures please visit www.OCTAVEONLINE.com


No comments:
Post a Comment